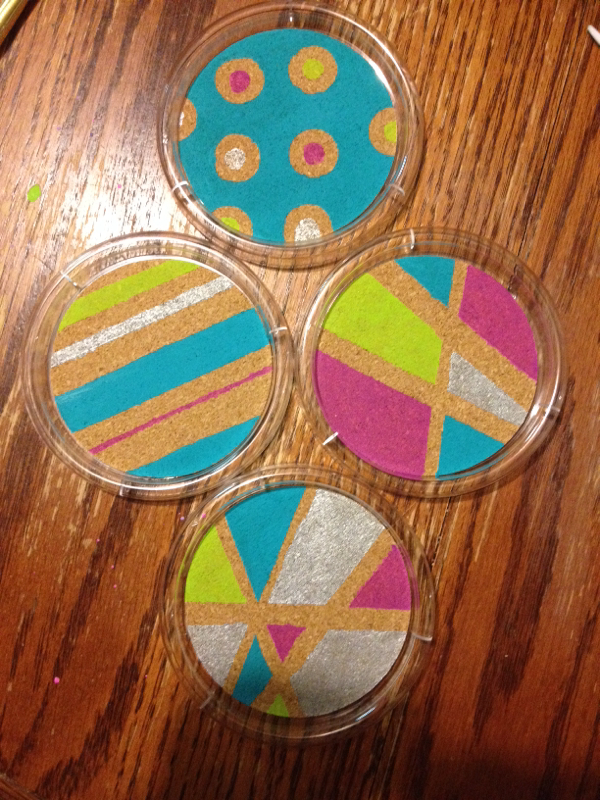
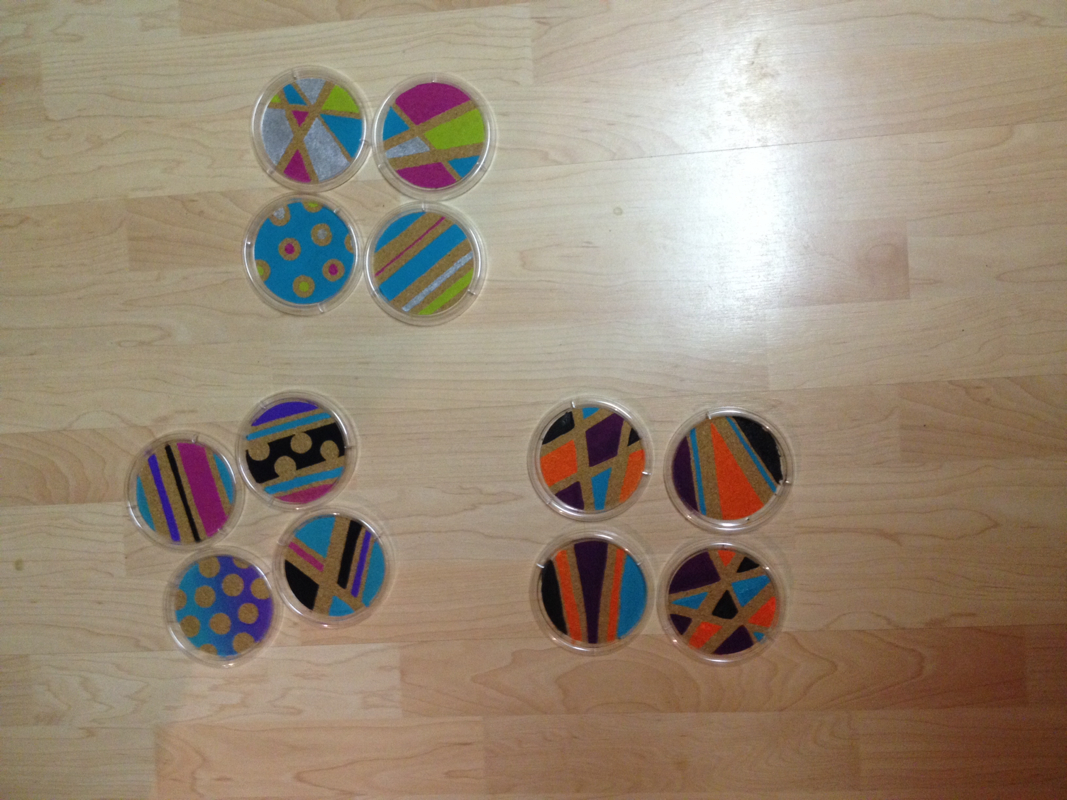
How fun are these?? And simple!! First, make a trip to the dollar store and pick up some cork coasters. Next, paint them!! That's all there is to it. We taped off a few of these designs using dot stickers and painters tape.
The first set of pictures is the set that I made. The other sets were done by my friends. Feel free to copy us and share your pictures
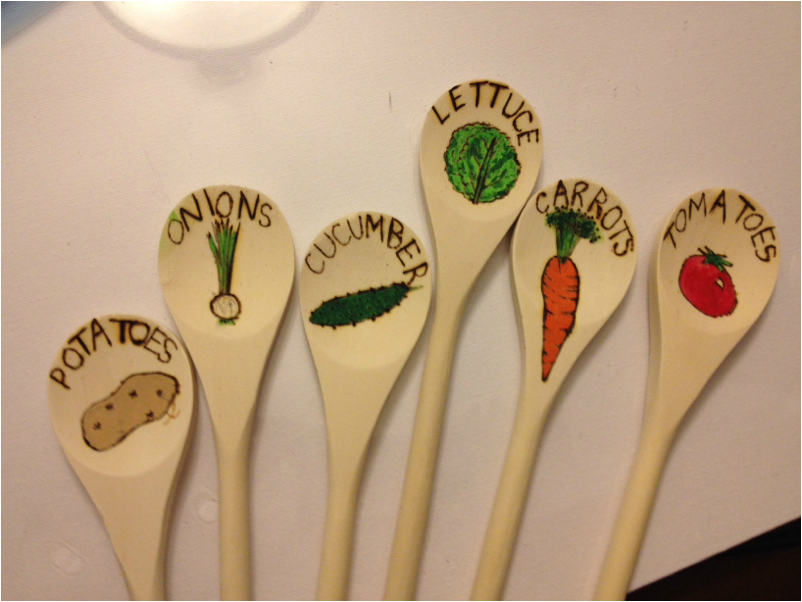
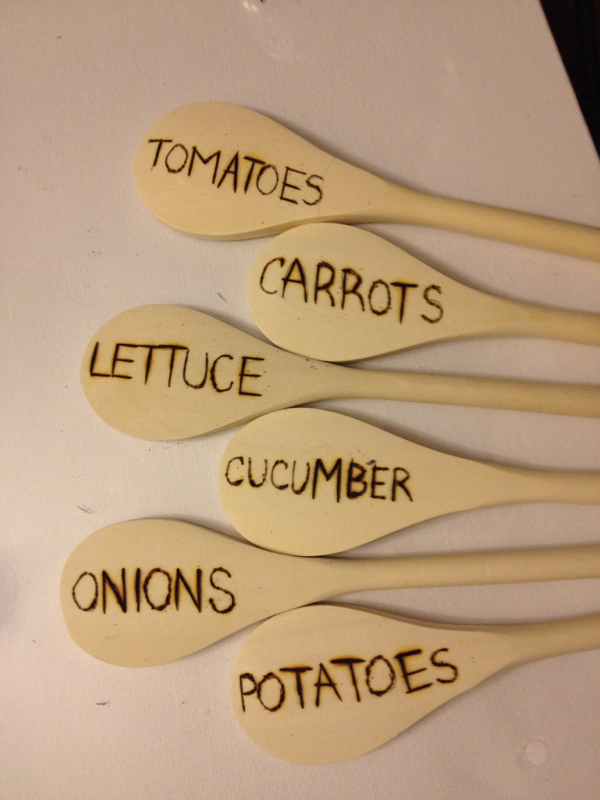
Yahoo,,, it's almost that time. Time to plant our gardens. Every year I seem to try to come up with new ways of marking my rows. This year... we've come up with these. We used our wood burning tools and sprayed them with a clear coat so the pictures aren't going anywhere. Aren't these cute?
This is the back. I know... it looks like a 6 year old wrote them. But trust me... wood burning is a lot harder than it looks.
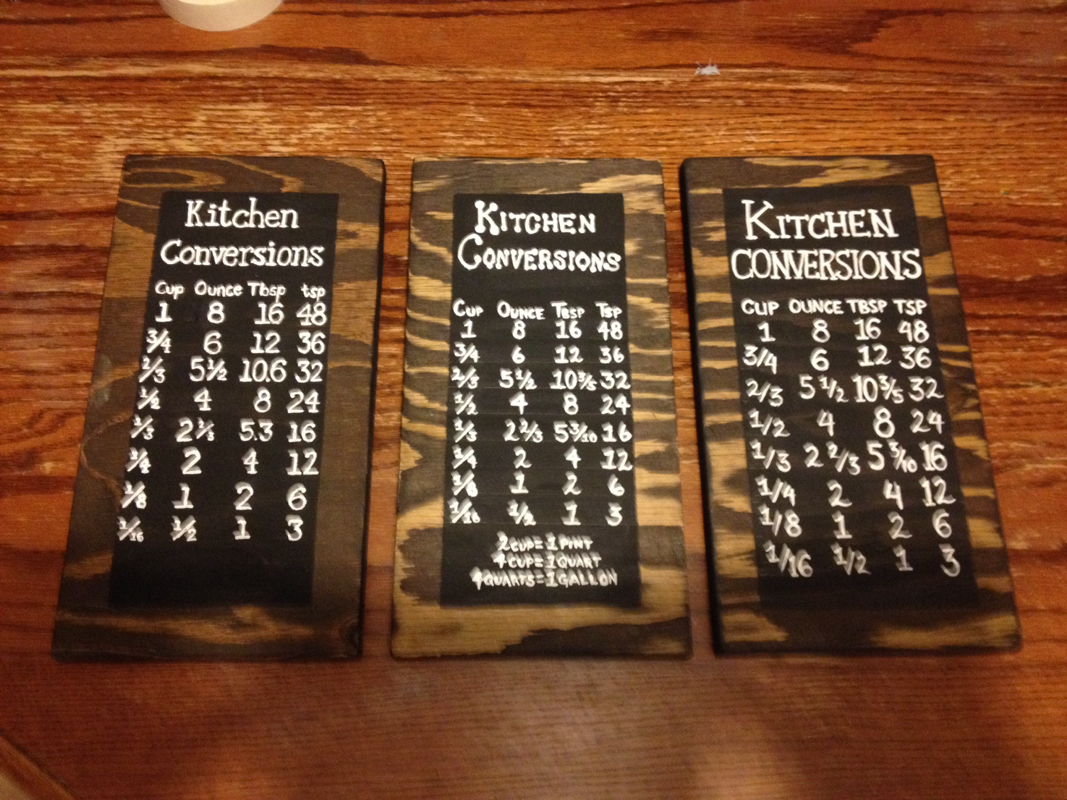
Do you ever half a recipe and then stand there trying to figure out what the conversion would be? Well I know I do!! That is... until we made these handy things. I propped mine up in my kitchen and I always refer to it. I never knew how much I would use it, but it's very handy.
We used a scrap piece of board and put a coat of stain on it. We painted the edges black and taped off a boarder and painted the center area black. We waited for it to dry, then started to draw out our numbers and letters. It seemed like everything was going very smoothly... and quick. Until it came time to painting the letters and words. I'm a bit of a perfectionist... so making sure the lines were even took far too much time. A paint pen would have shaved off a couple hours. I love them!!
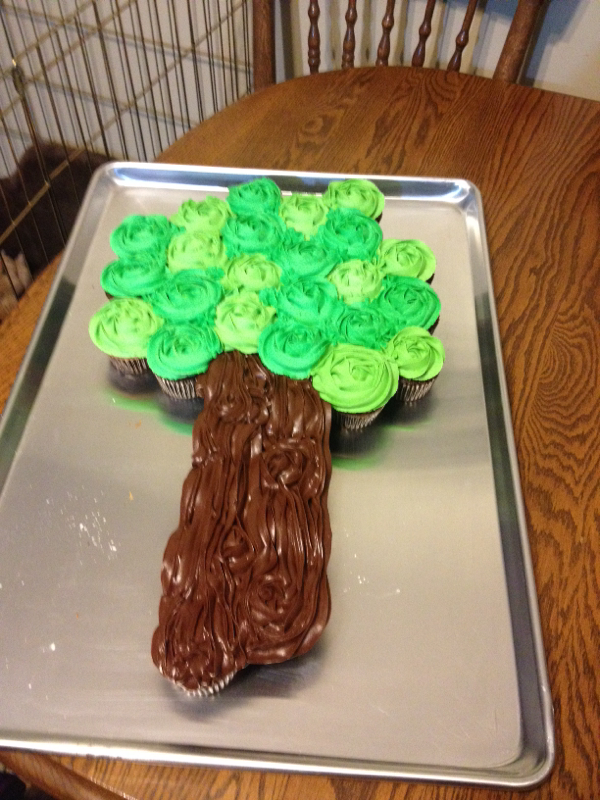
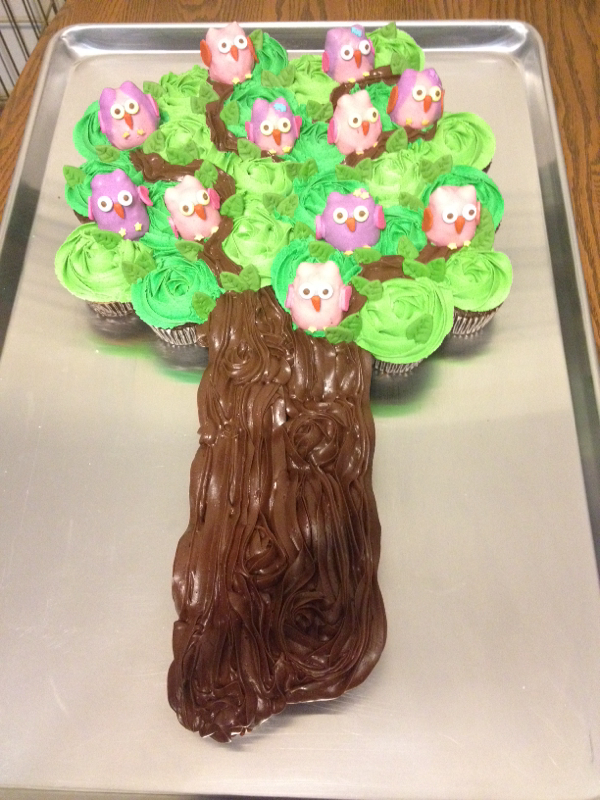
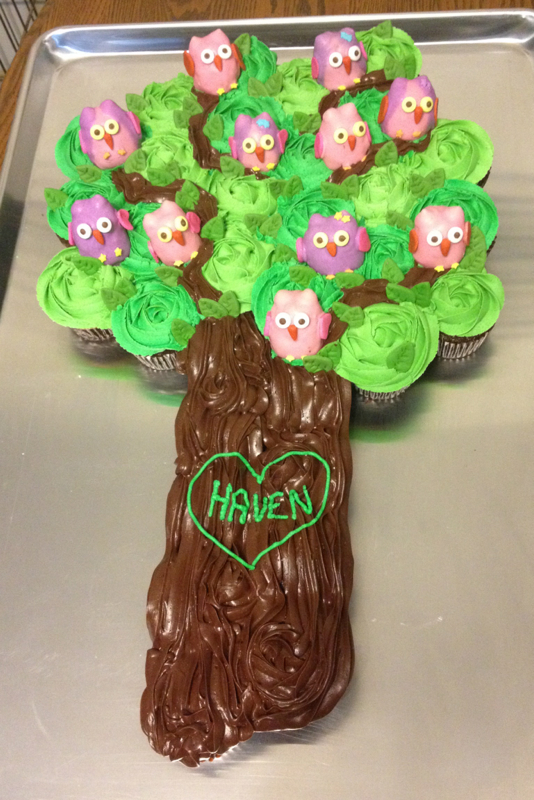
My girlfriend's daughter just had her 5th birthday and I was asked to make her birthday cake. I asked what the birthday theme was and she said owls. PERFECT!!! I love owls too. So I looked on Pinterest and found
this amazing tutorial... They're obviously cuter than mine. But this after a few hours of work. I had to bake my cakes/cupcakes. I crumbled as many as I think I would need and started adding in a tub of icing. I mixed it until it felt like it would hold together on it's own but wasn't too sticky. I rolled them into oval balls, then froze them. Then I took a couple chocolate chips and glued them on with some melted chocolate.
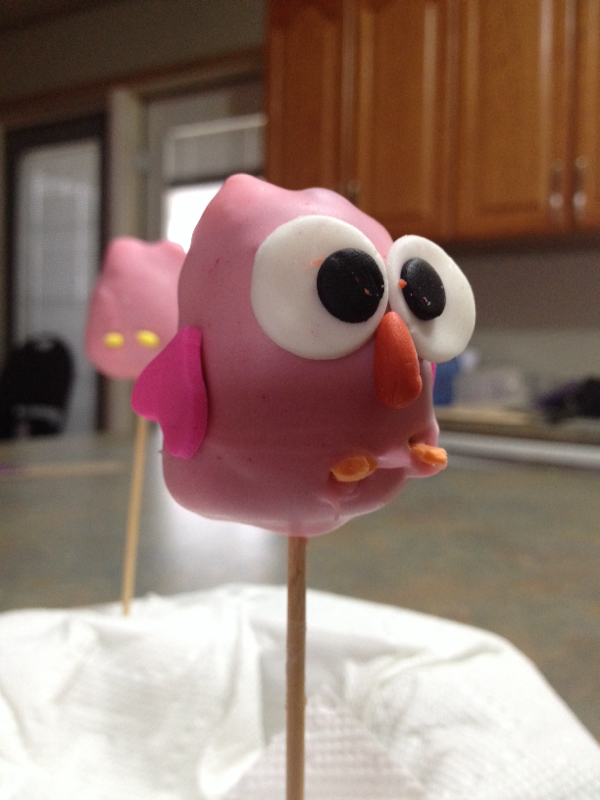
Awww, they're starting to look like little owls. I also put them on small wooden dowels with a bit of melted chocolate, then I froze them again. Then took them out and dipped them into colored Wilton Candy Melts. This was a little difficult because they kept slipping off the stick... I think I made my owls a bit too big??
I made some wings, beaks and eyes with fondant and let it dry overnight. As you can see the eyes were a lot larger than I had expected them to be. So instead I used the white and yellow pieces from a candy necklace and melted some chocolate into the holes. They fit nicer on the owl heads. Then I used little star shaped candy confetti for the feet.
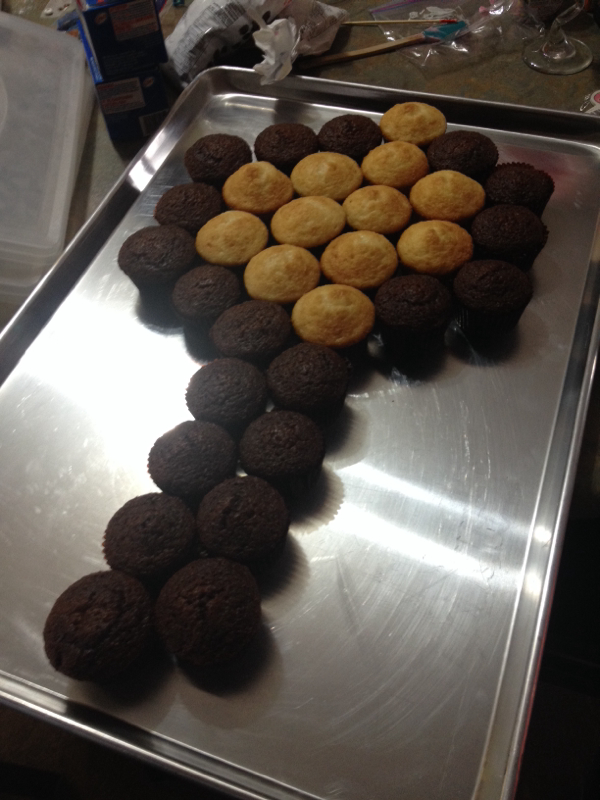
I started to assemble the cupcakes to resemble a tree. As you can see here. I put a dab of icing underneath each cupcake to make sure they didn't slide around. Then came the icing. I started with the trunk. I tried to make a few swirls to represent knots.
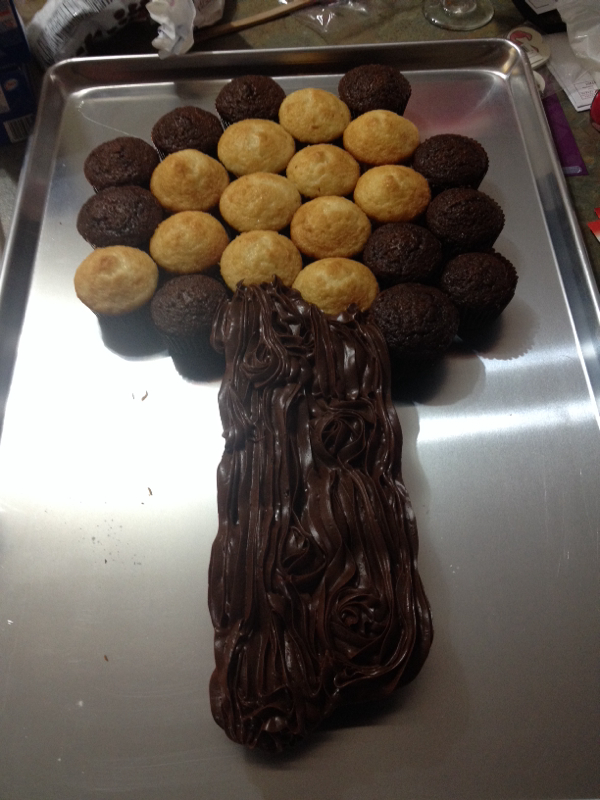
I mixed two colors of green to add a little dimension. I also made some matching green leaves with fondant to fill in any spots that need a little extra.
Then I added a few branches and placed the owls in the tree. Voila!!! 10 hours later... hahaha
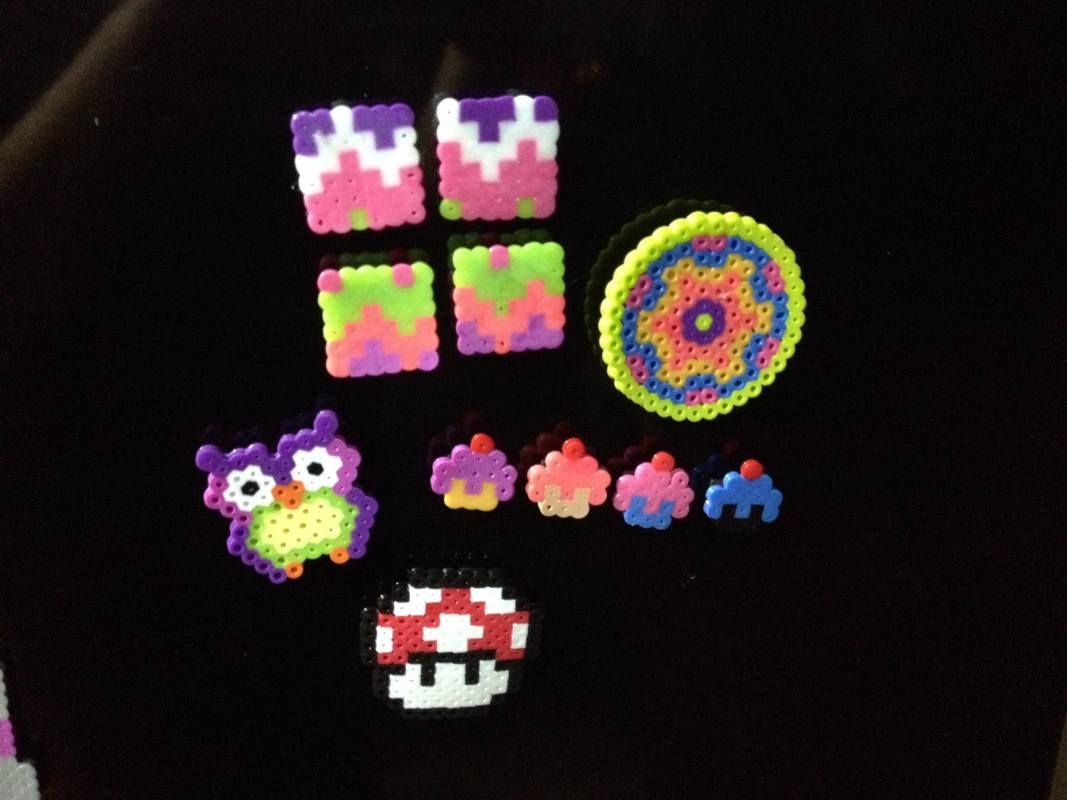
If you're anything like me, you LOVED crafts when you were younger. These perler beads were a blast from the past... and finding them, well that's another task all on it's own. I turned these into magnets, because who doesn't love magnets??
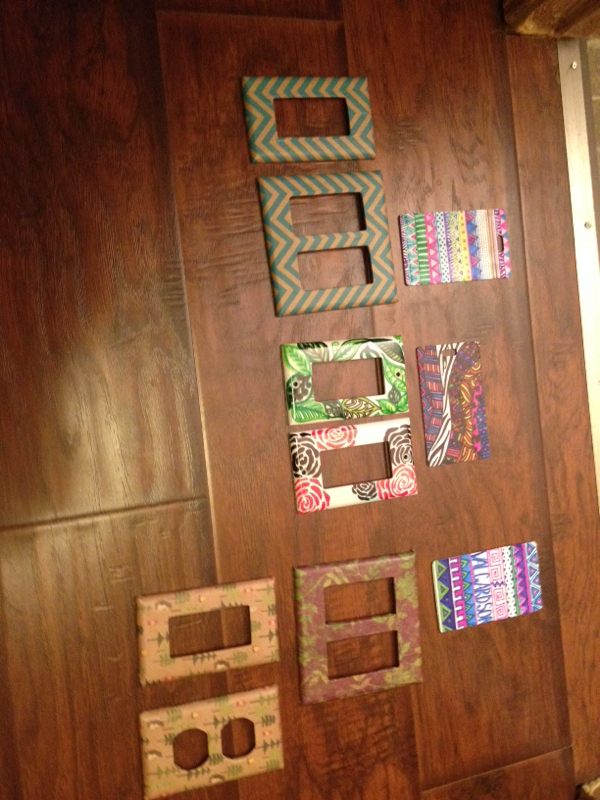
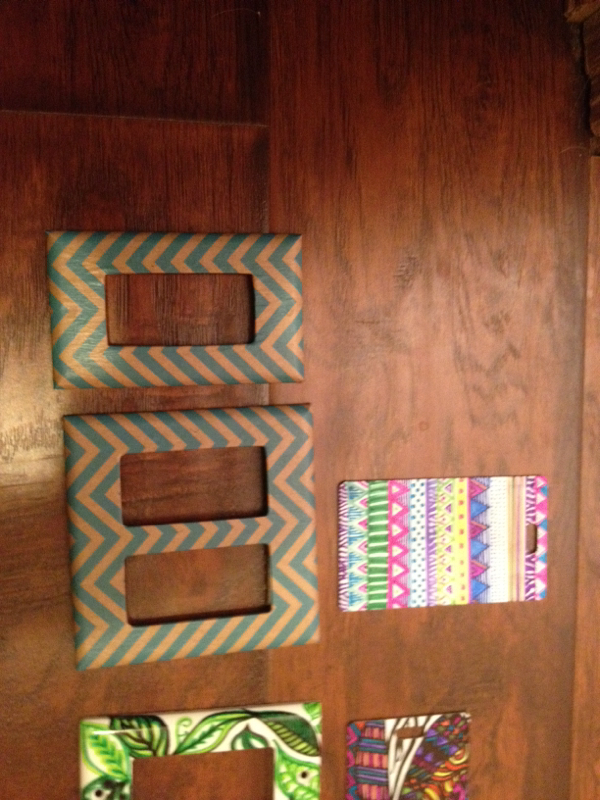
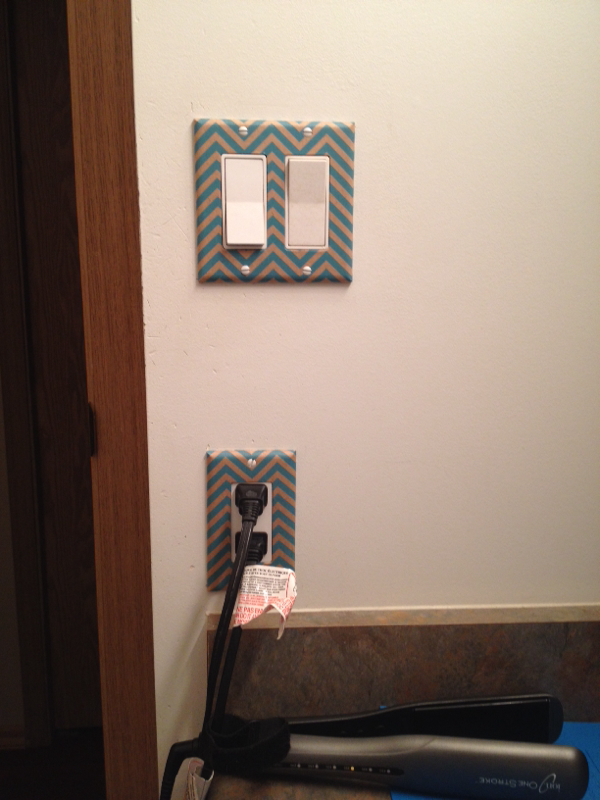
Last night was our weekly craft night. My turn to host. I was getting bored of my plain white light switches, so I decided it was time for a change. I took a trip down to Home Hardware and picked up a handful. They were really cheap!! I think like $0.80 for the singles and maybe $1.70 for the double ones. And they had outlet covers for $0.40 cents. VERY cheap upgrade. I went to the Dollar Store to get some ideas and see if they had any interesting paper. And I found this beautiful wrapping paper. It matches my bathroom perfectly.
We all did ours a little differently. One of my friends did hers with scrapbook paper, my other friend used Sharpies and I used wrapping paper. The possibilities are endless.
Oh and as you can see, we also decorated our own luggage tags.
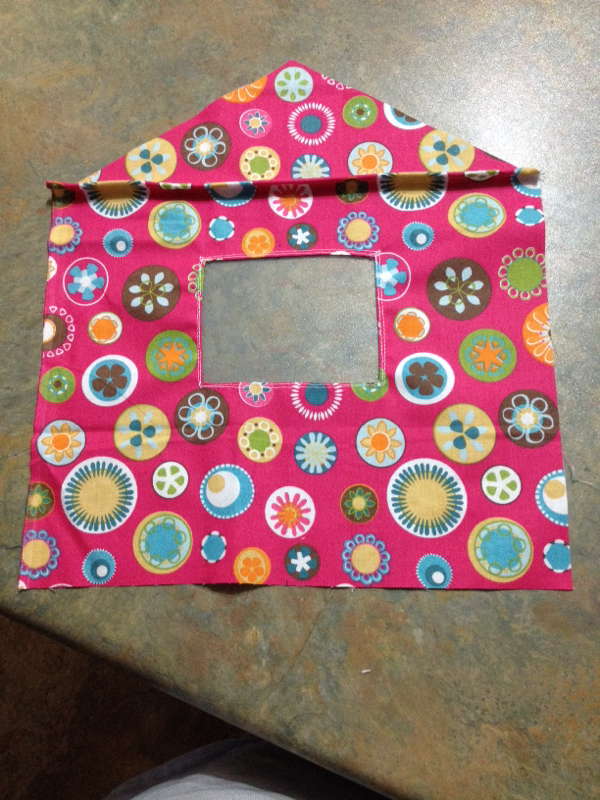
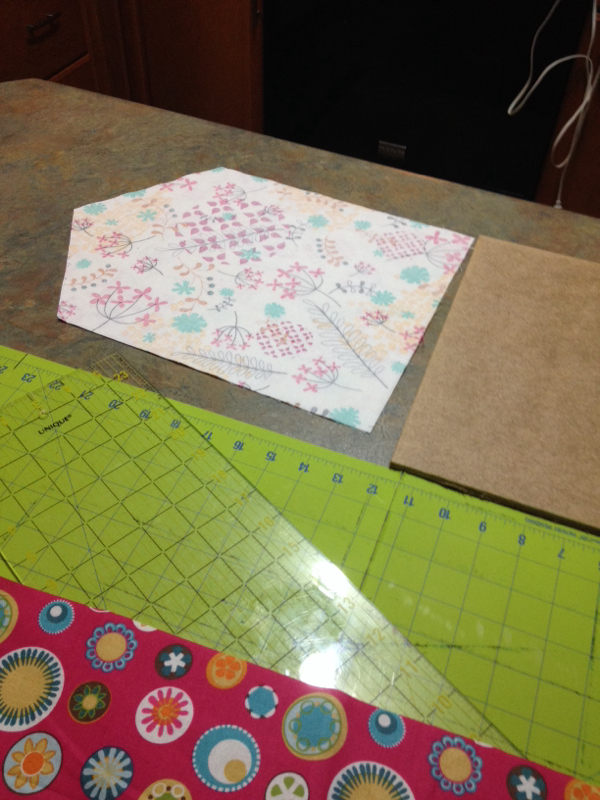
My sister asked me to crochet a rug for my nieces Barbie bathroom. Wait a minute... What?? She likes Barbie now? Well of course I'll make a rug. But I can't stop there. So I started thinking... what was my favorite Barbie accessory that my Grandma or my Mom made me? Ah HA, a Barbie tent. So... like always, I scoured Pinterest for a tutorial or a pattern of some kind. And there was NOTHING. Well, I shouldn't say nothing. They had a lot of the dome style tent (which probably would have been the easier route), but none like the one I had growing up. So I figured, I would design my own. After a few cuts, stitches and plenty of seam rips... I came up with this....
It took quite a while but I was pretty impressed with the results. I had planned to make the walls 12 inches high and 12 inches wide to simplify things. So I brought in some scrap particle board I had and did some measuring. Well the wood was only like 11.5 inches wide, so I had to alter my pattern and hope that Barbie would fit. I drew out my design and started cutting. I did one wall at a time. I used some scrap tulle for the screen on the window. I eventually sewed a flap with a button for some 'privacy'.
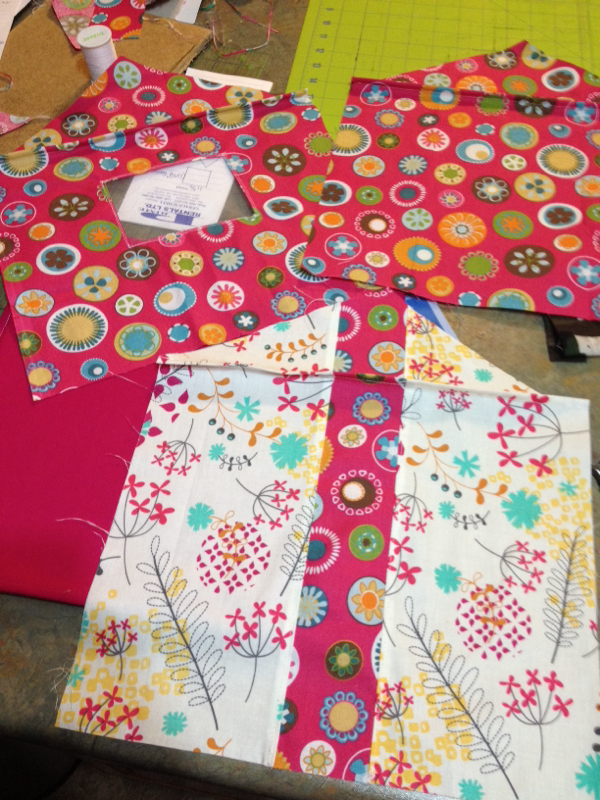
This was one of the side walls. But for some reason, I cut it too narrow... DUH. So I had to improvise. I decided to cut it in half and insert a strip of the corresponding fabric. It turned out good. And you'd never know that I didn't meant to do that. Haha.
This is the front and back walls before I cut the hole for the door. And there is one of the side walls with the strip insert. Not too bad, hey?
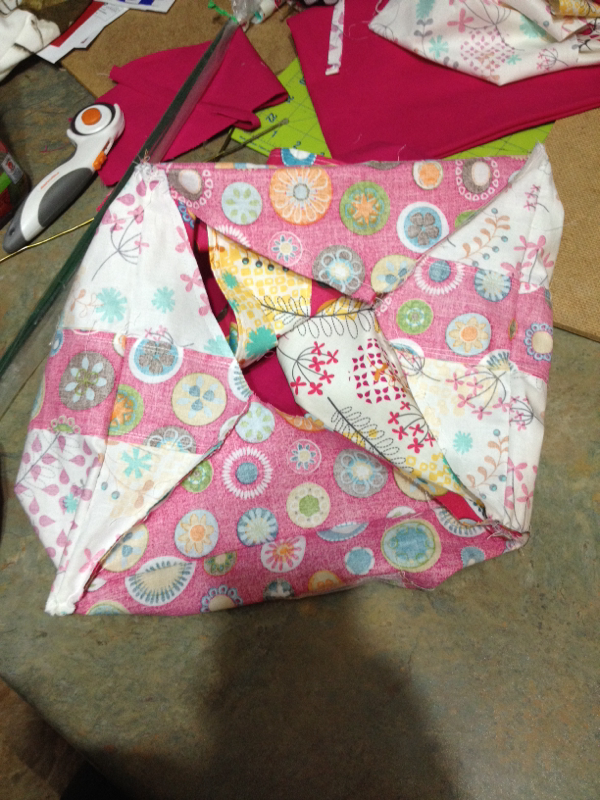
And this is where things when horribly wrong. I'm clearly not an architect because I can't construct a roof. Apparently you have to take into consideration the height at the top that it has to be to form a peak with the other walls. If that makes any sense? Well... mine were way too short. Live and learn. This is what it looked like after I sewed two sides. Pretty wonky. So I ended up cutting the entire roof off and piecing in some other fabric, as you'll see in the final picture.
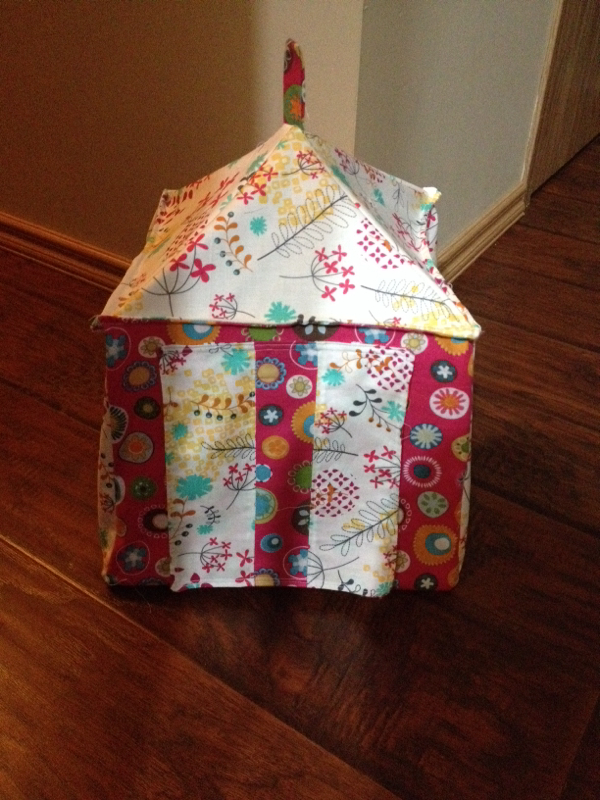
So, you've been waiting... and here it is. The final product. Well... almost. I had sewn on some cute buttons afterwards to keep the window and door open. I made some matching sleeping bags... but of course I just love giving things away before I remember to take pictures of it. Maybe I'll be able to snap a picture of it in action and I can update this post.
Anything is possible with a little creativity and a lot of patience.
Happy Crafting!!!
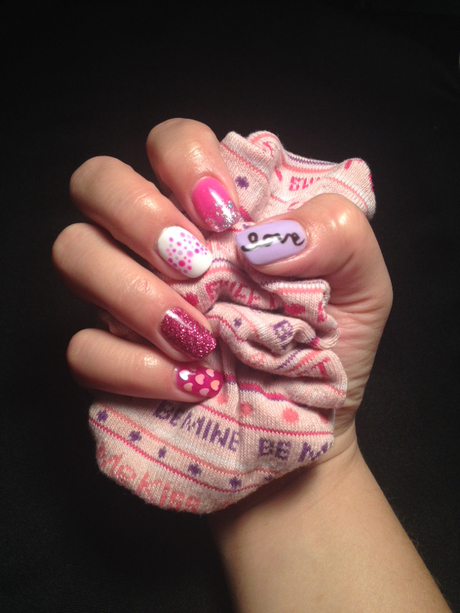
I had to share these. How cute, right? I normally stick with blues, greens, greys... not pink. Don't get me wrong, I love the color pink... but I don't own a lot of pink stuff. With Valentine's Day right around the corner, it's a perfect excuse to rock these stylish nails.
Pinterest inspired me. In fact... I think each nail design was inspired by a different picture. A little wild, I know... but I have to show some creativity somehow!!
Thanks bestie for hooking me up with this set.
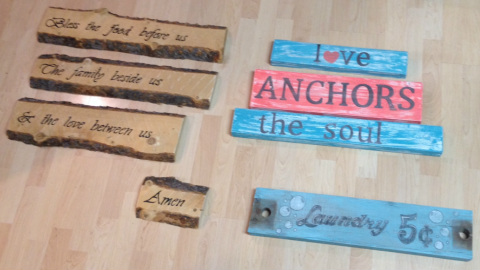
My girlfriends and I get together once a week and do a craft together. Our goal is to be thrifty and make beautiful things. Last week we turned a pile of scrap wood into some decorative artwork.
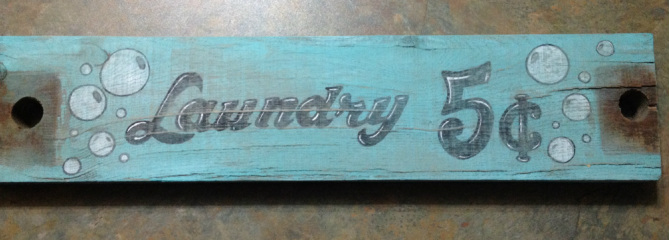
These aren't quite finished. The top left ones are supposed to be trimmed down. And there will be an anchor painted on the "love anchors the soul" one. And the laundry one is going to have a big chunky rope with knots tied in the holes.
I made the laundry one. I'm not too sure whether I'm going to keep it, or gift it.
Sorry the pictures are blurry.
Another passion of mine is baking. So again... I thought this was my calling. So I signed up for a few different cake decorating classes and started my little side business I called Sweeti Cakes. My first order was for a surprise birthday party, they wanted 100 cupcakes delivered and set up. Wow. Things were going great. I did a wedding cake, trade shows, cupcakes, cakes and more cupcakes. I started to dread the calls for people ordering cupcakes.
Oh no... I've done it again. My favorite thing to do has turned into a chore. So, I stopped!! Well, not entirely. I've been making birthday cakes for my girlfriends kids for the past 5 years. And I bake cupcakes for an employee appreciation night every year for a local company. I still enjoy doing it, in small doses.
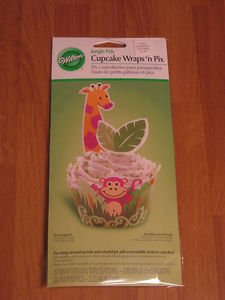
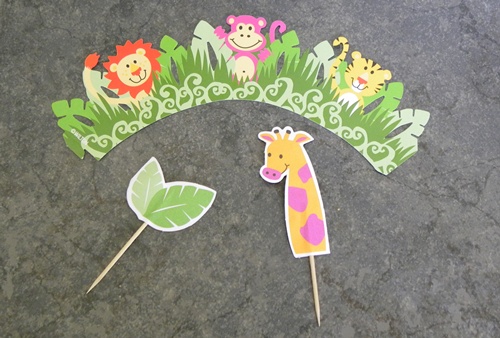
One of my girlfriend's sister just had a baby in December and she was throwing her a surprise baby shower and asked if I could make some Jungle themed cupcakes. She picked up these cute
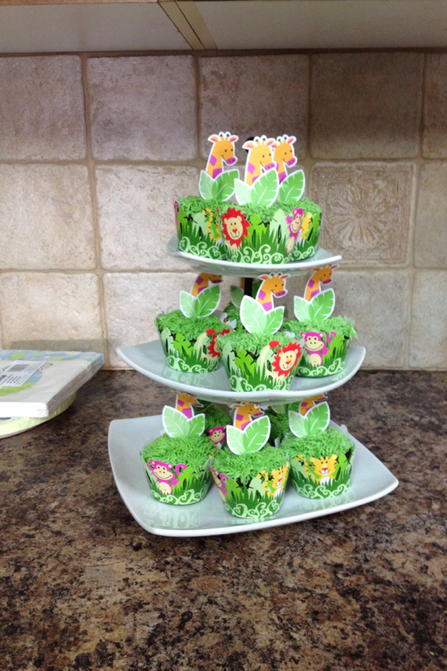
Wilton Wraps 'n Pix at Michael's. I baked chocolate cupcakes with vanilla buttercream piped to look like grass.
Too cute!! Maybe even cuter than the Wilton picture?


 RSS Feed